Overview
In previous post, I explained about the AVI Load Balancer Architectures which can be achieved for VMware Horizon deployment. In this post, I will provide the step by step guidance on how to deploy AVI load balancer for Horizon on VMware Cloud (VMC) on AWS .
Basically I will cover “Single L4 Virtual Service” and “(n+1) VIP” architecture deployments in this post.
Planning
- AVI Controller : 172.16.103.10 (stand alone)
- Service Engines : 172.16.103.11, 172.16.103.12
- Virtual Service (VIP) in front of Unified Access Gateway (UAG)
- Single L4 VIP Deployment : 172.16.104.11
- (n+1) VIP Deployment : 172.16.104.12
- Virtual Service (VIP) in front of Connection Server (CS) : 172.16.104.10
- UAG IP : 172.16.102.21, 172.16.102.22 (DMZ Network)
- Connection Server IP : 172.16.101.9, 172.16.101.10
- Public IP for External Access
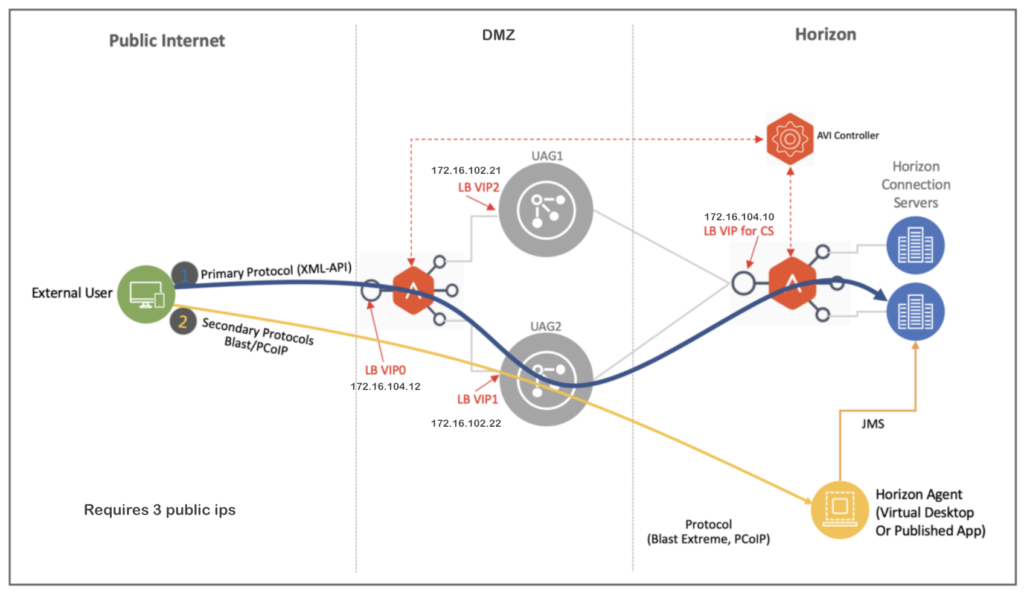
A. Deployment Layout for “Single L4 VIP”

Deployment of AVI Networks Controller and Service Engine
For deployment of AVI Networks Controller and Service Engines, follow the official guide provided by AVI Networks. Prior to proceeding below steps AVI Controller and Service Engine deployment must be completed.
Create Cloud
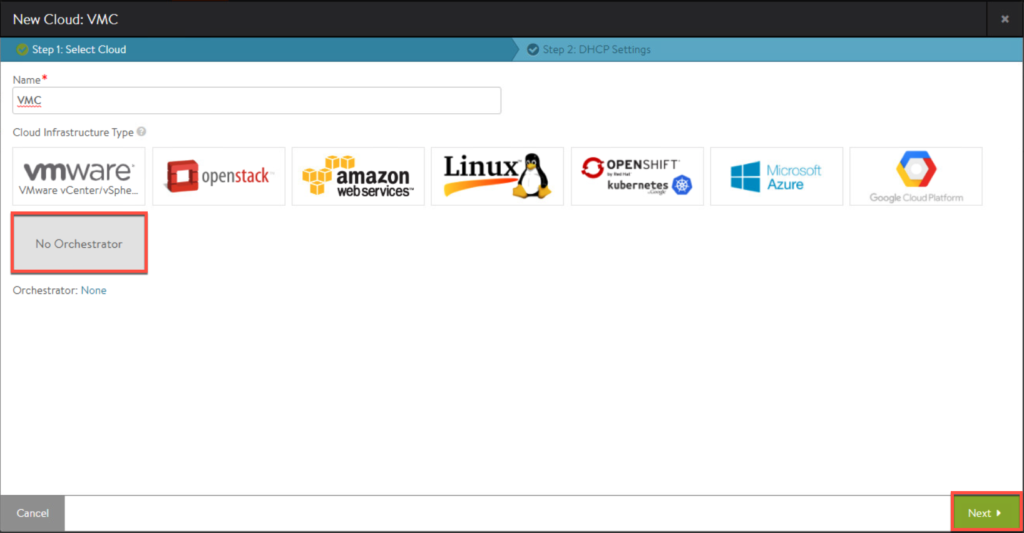
In this section, we will create a “Cloud” for Horizon on VMC deployment. The word “Cloud” in AVI Networks is the type of infrastructure on which you are going to configure load balancer i.e. VMware vCenter/vSphere (on-premises), AWS, Azure etc. For VMware cloud on AWS deployment, we need to choose the cloud option [No Orchestrator].
1. Log in to AVI Networks admin consoles.
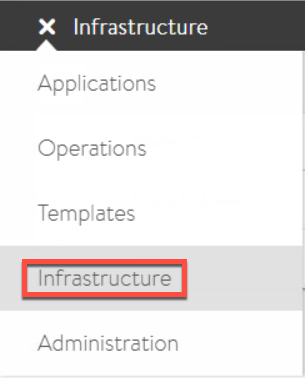
2. From left top corner menu, select [Infrastructure] > [Cloud] > [Create]
3. Give a name of your choice and select [No Orchestrator] for VMware Cloud (VMC) on AWS deployment.
4. Leave as default and select [Save].

5. Now you have created a cloud “VMC” as seen below.

Create IP Groups
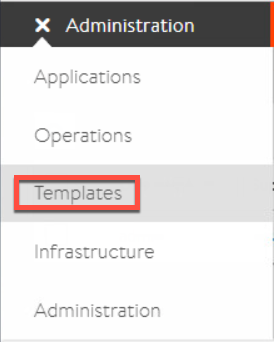
6. From left top corner menu, select [Templates] > [Groups] > [Create IP Group].

7. This is a IP group for UAG, so enter all the IP addresses of UAGs which exist in your environment and [Save].
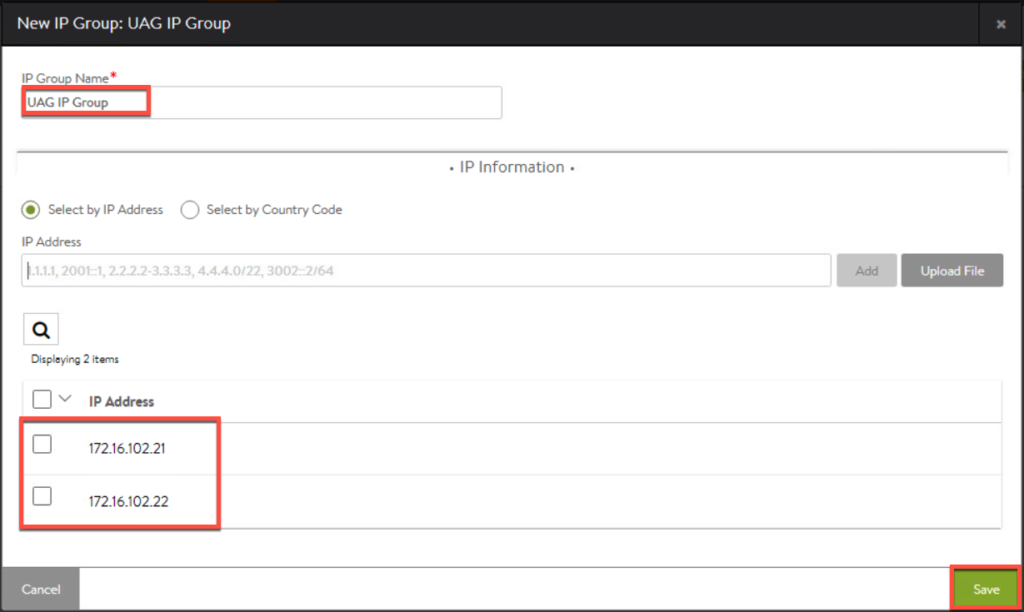
8. Create a IP group for Horizon connection server as well. Once you created the groups, you will see the list of IP groups as below.

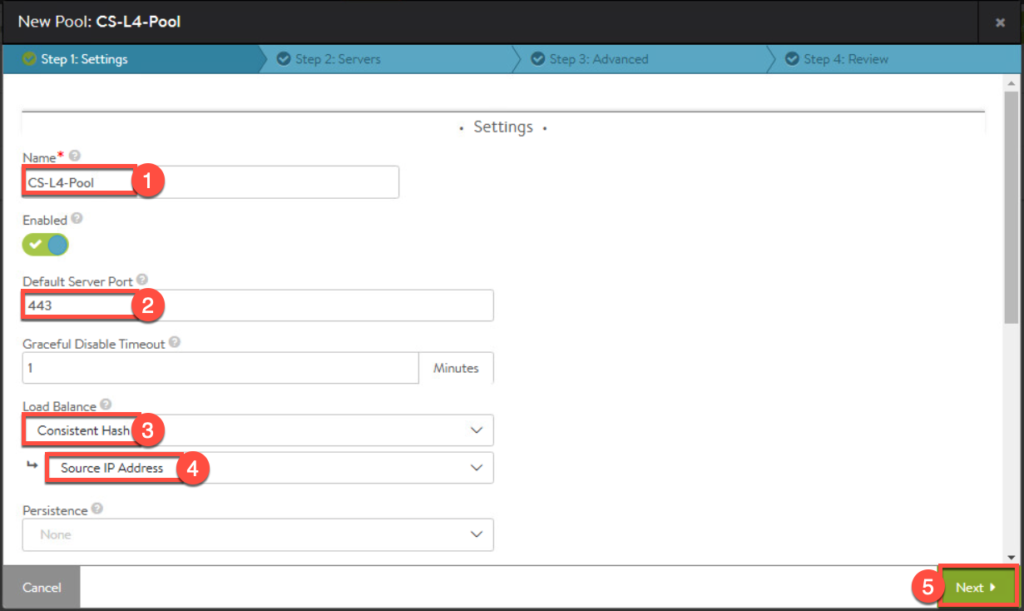
Create Pools
In this section we will create two pools. One for connection server load balancer and another for UAG load balancer.
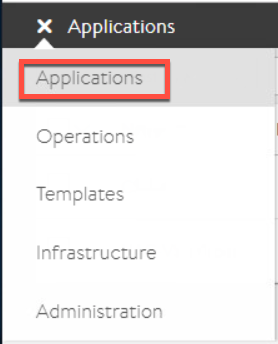
9. From left top corner menu, select [Applications] > [Pools] > [Create Pool].

10. Select the cloud you created earlier in step-5.

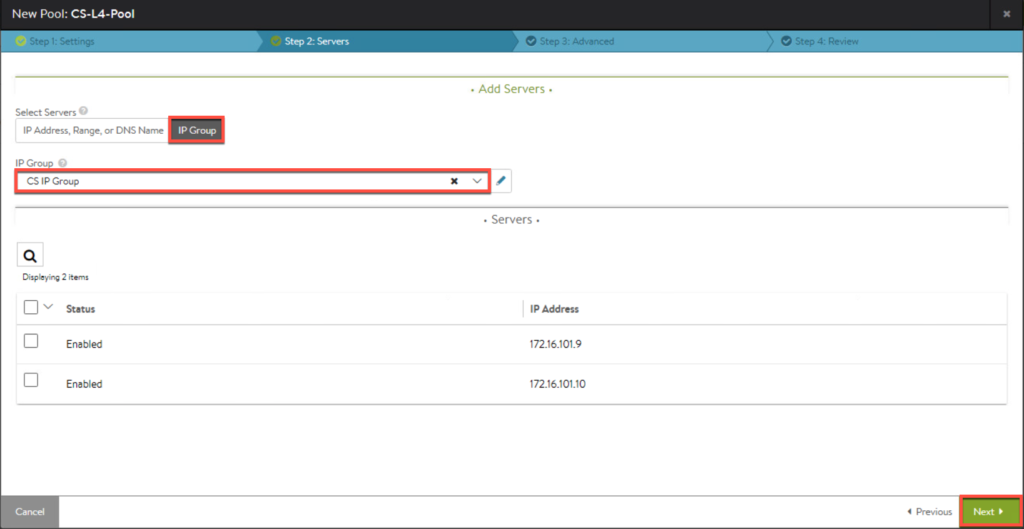
- Pool for connection server load balancer.
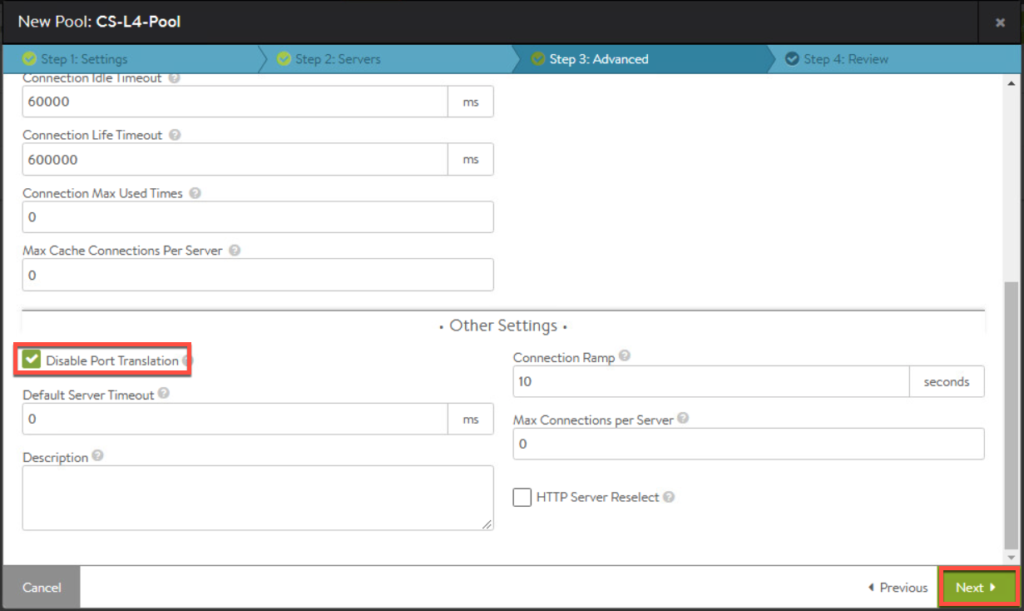
11. Enter the parameters for pool.
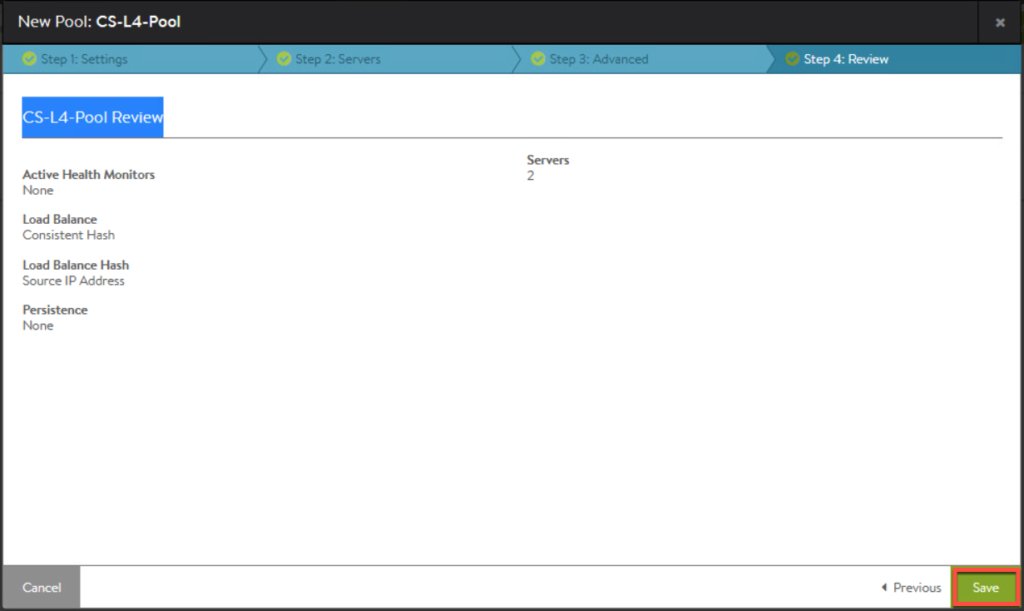
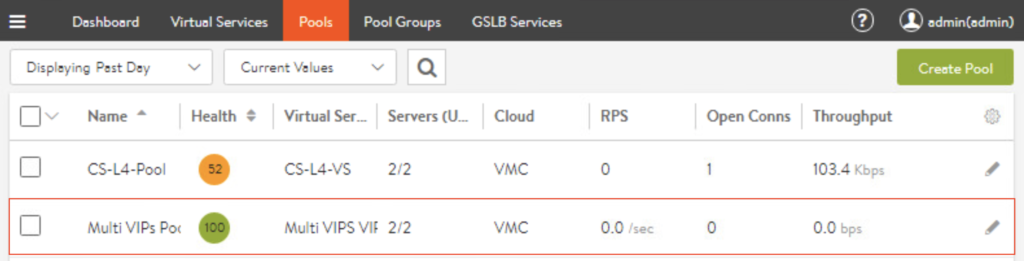
11. Confirm first pool in list as seen below.

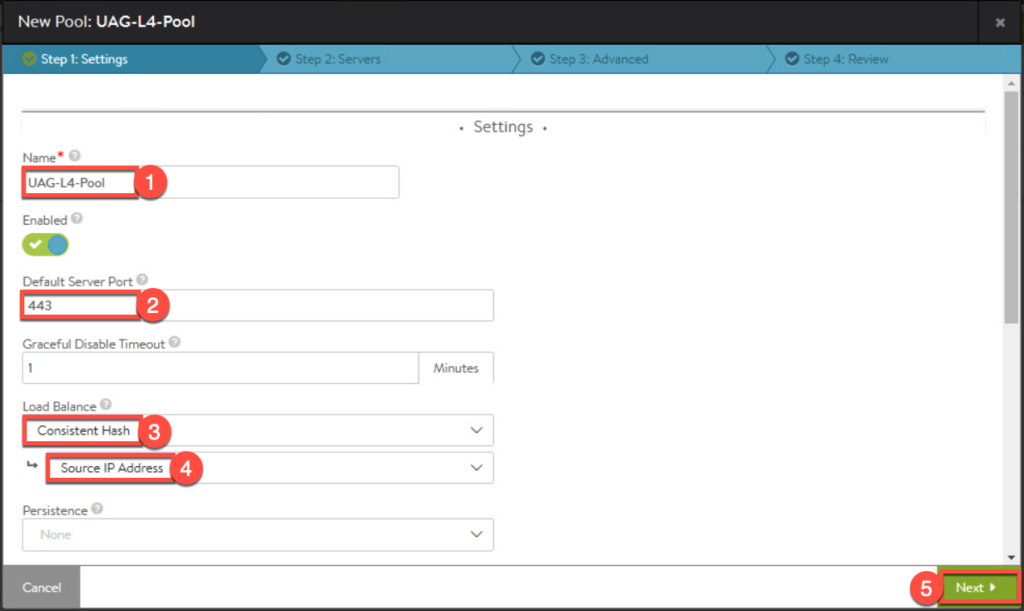
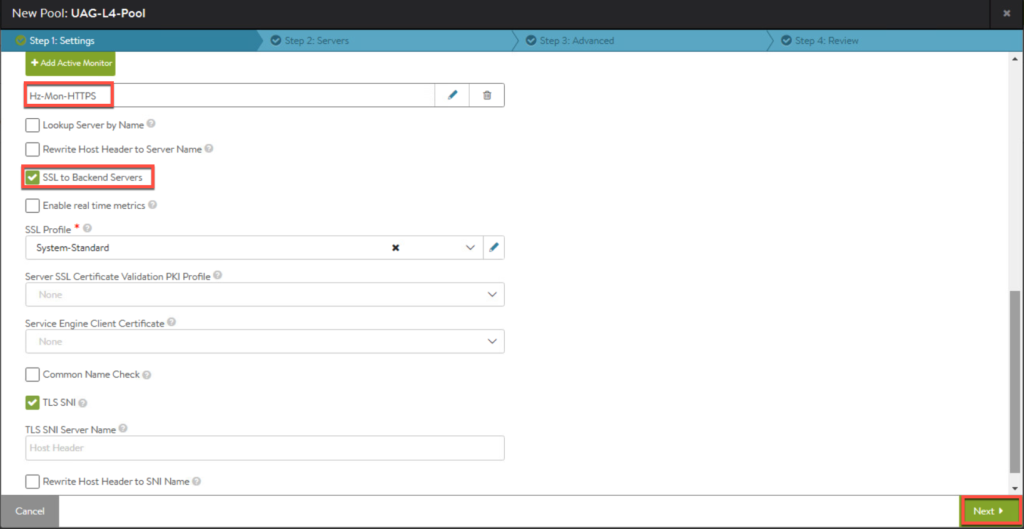
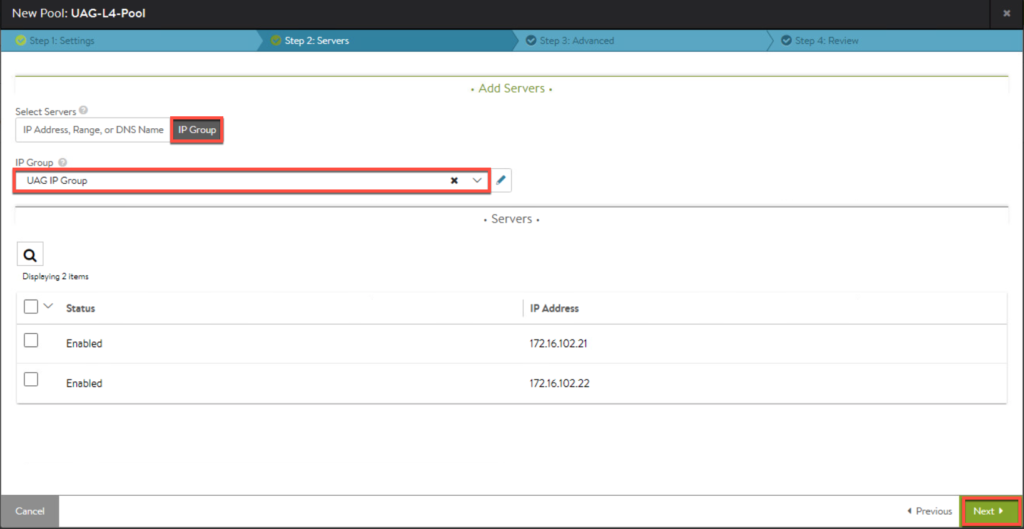
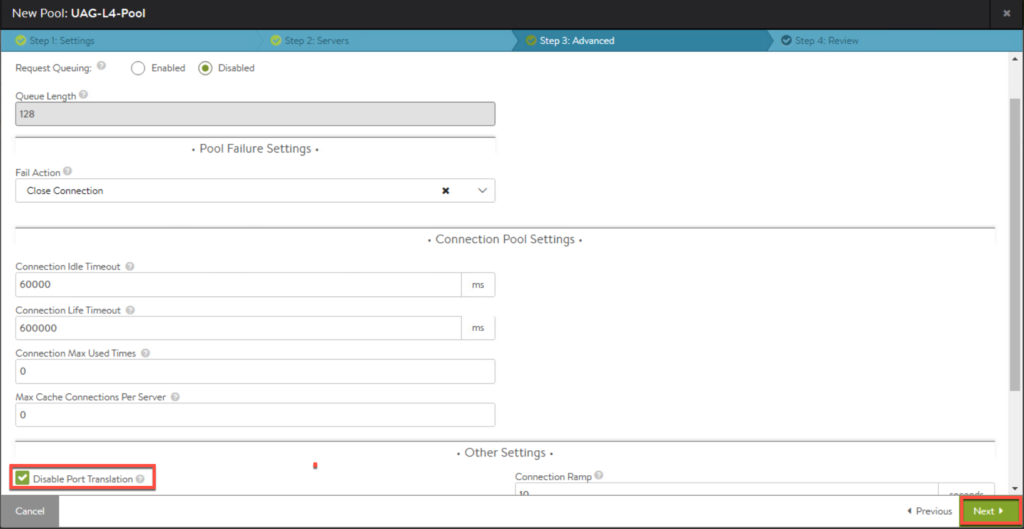
- Pool for UAG load balancer.
12. Next we will create a pool for VS in front of UAGs. Enter the parameters as seen below and [Save].
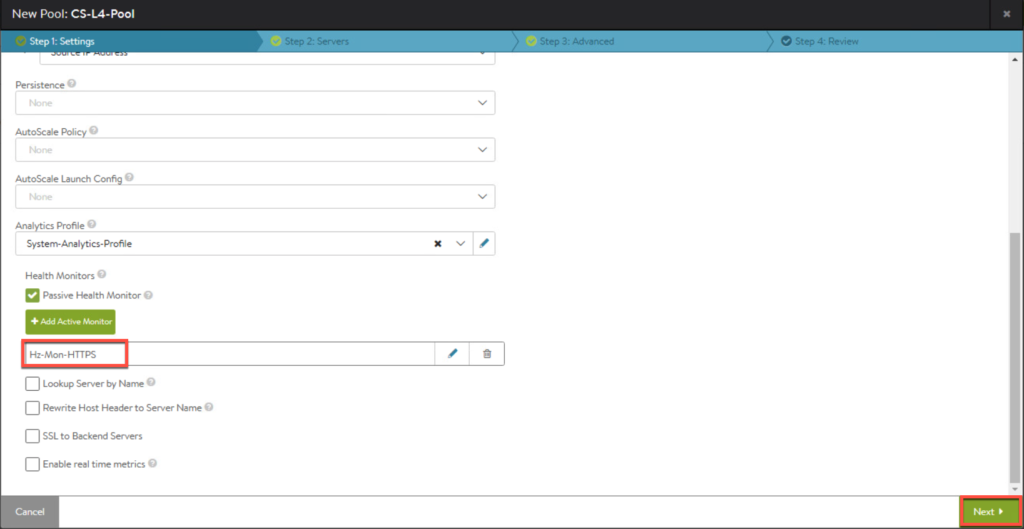
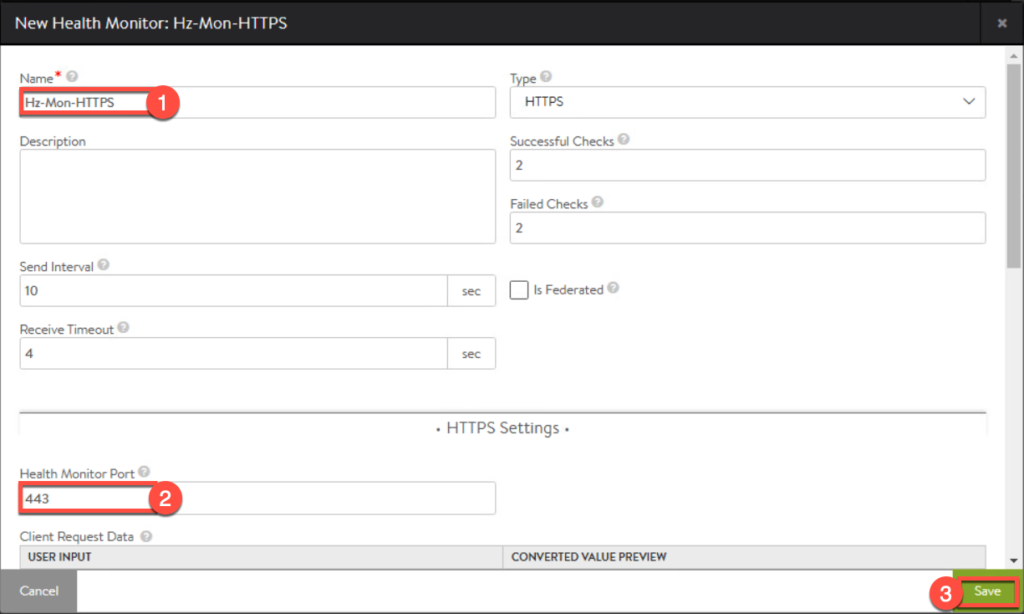
Creating Health Monitor (optional)

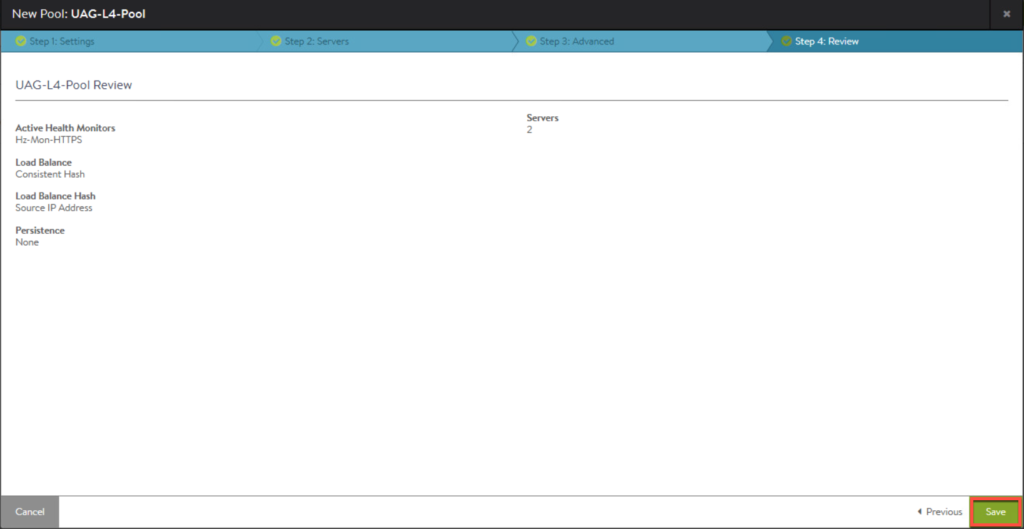
14. Confirm second pool is created and exists in [Pools] list.

Create Virtual Services
In this section we will create two virtual services. One for load balancing connection server traffic and another for load balancing unified access gateway traffic.
15. From left top corner menu, select [Applications] > [Virtual Services] > [Create Virtual Service].

- Virtual service for load balancing connection server traffic
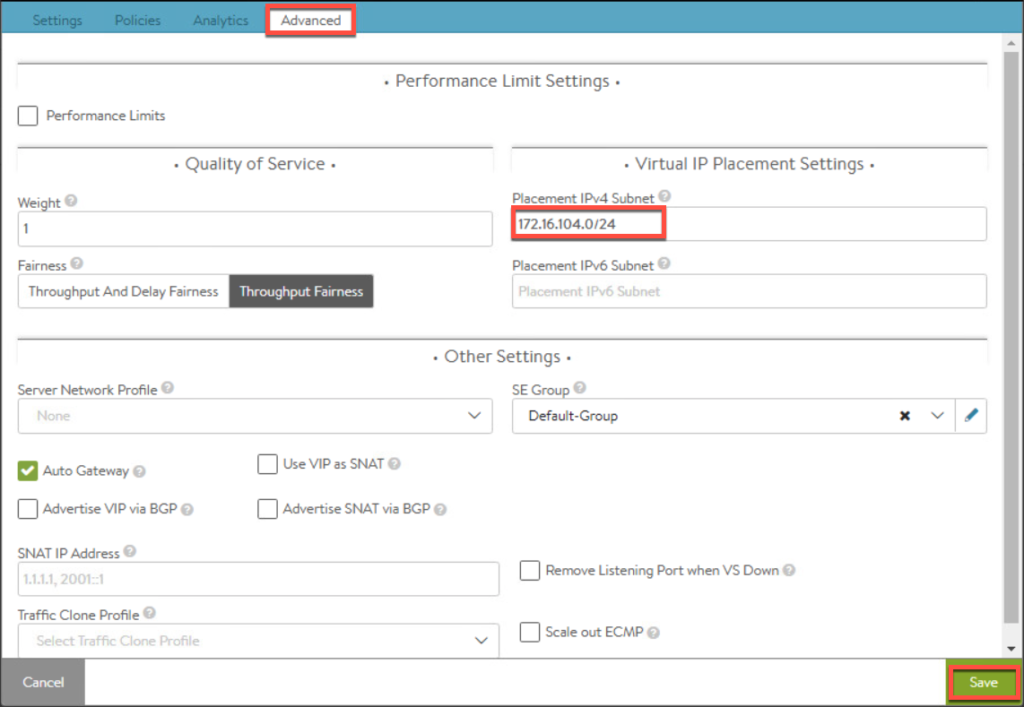
16. Enter the parameters for Virtual Service and [Save].
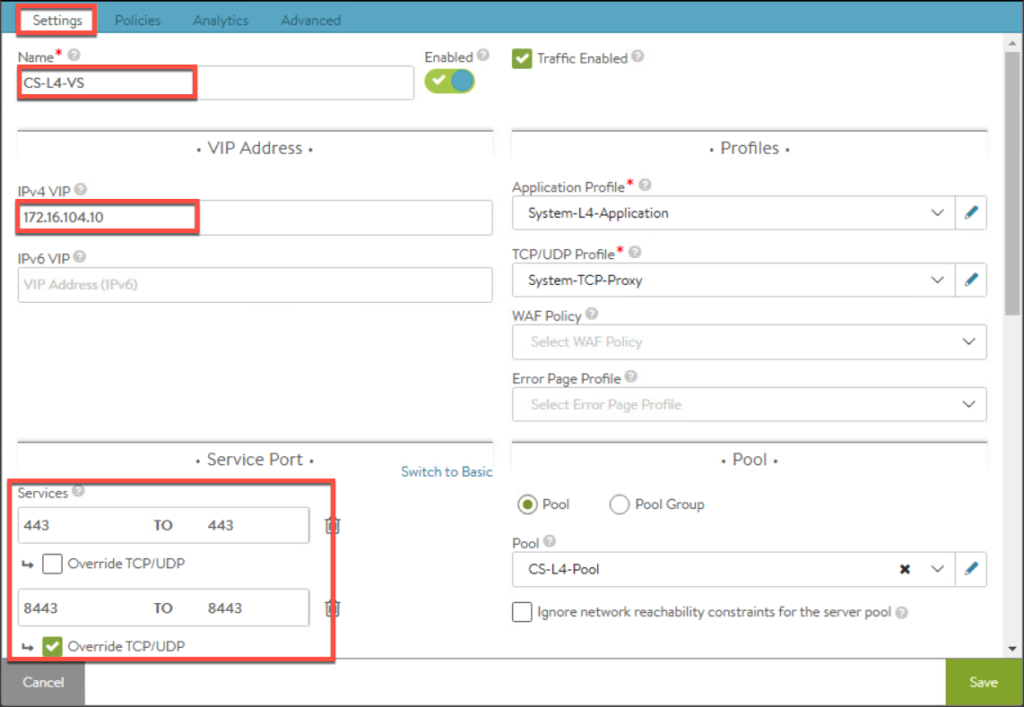
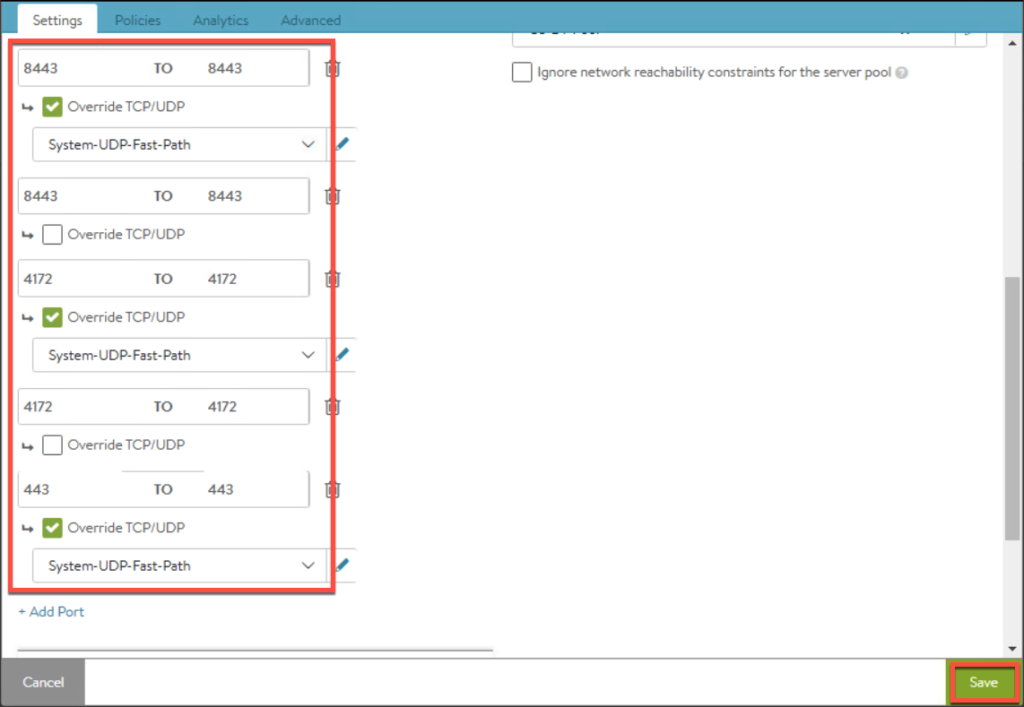

- Virtual service for load balancing UAG traffic
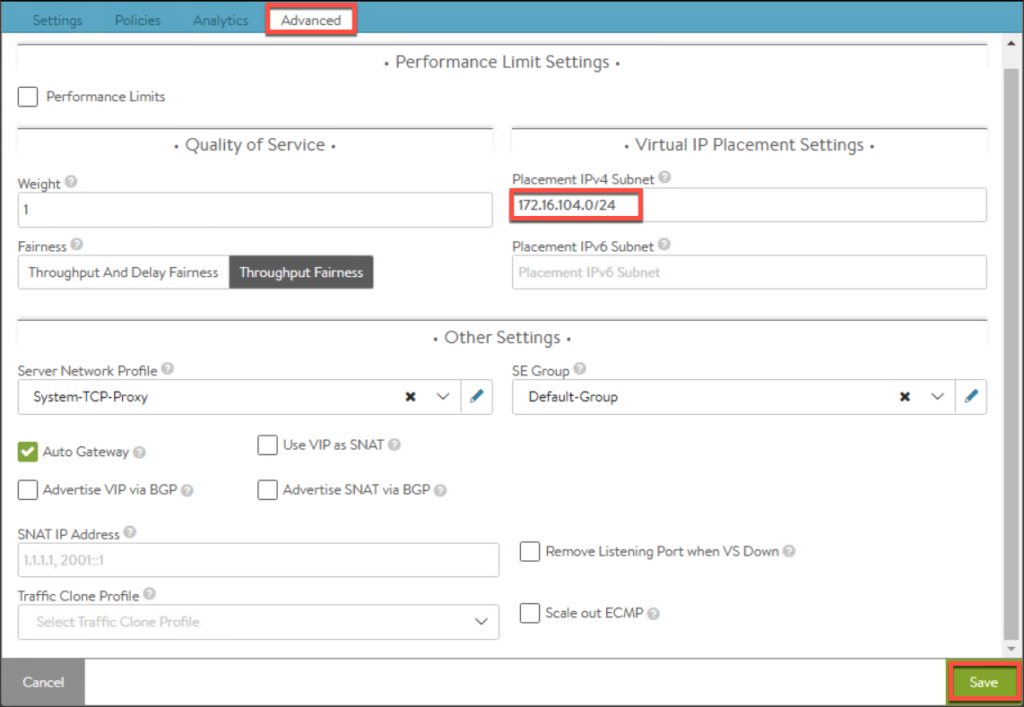
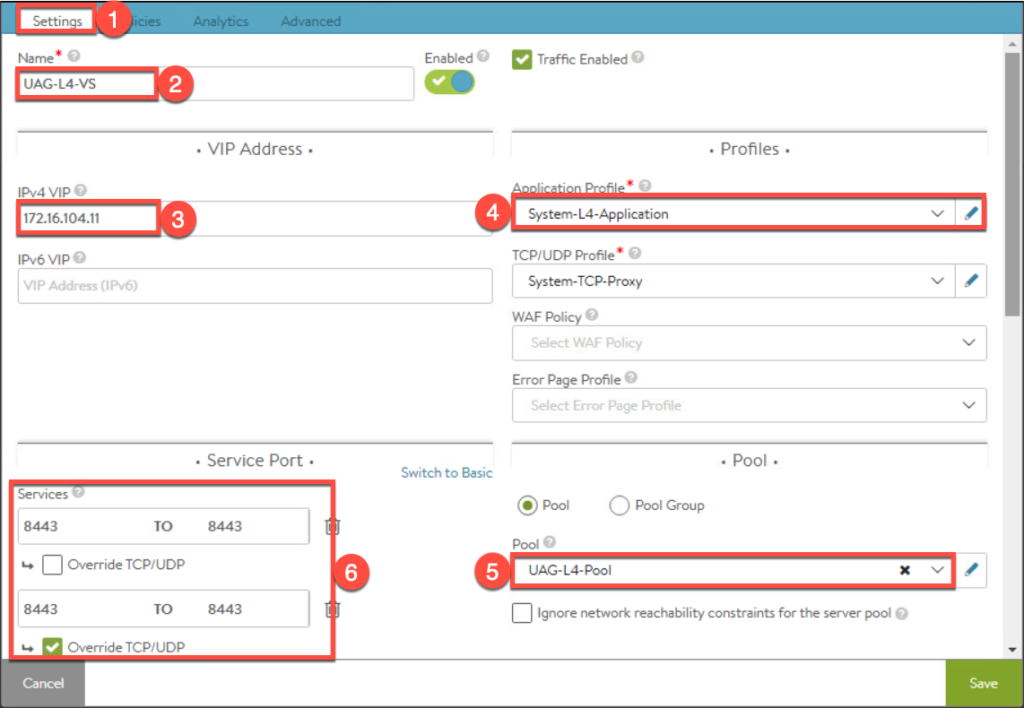
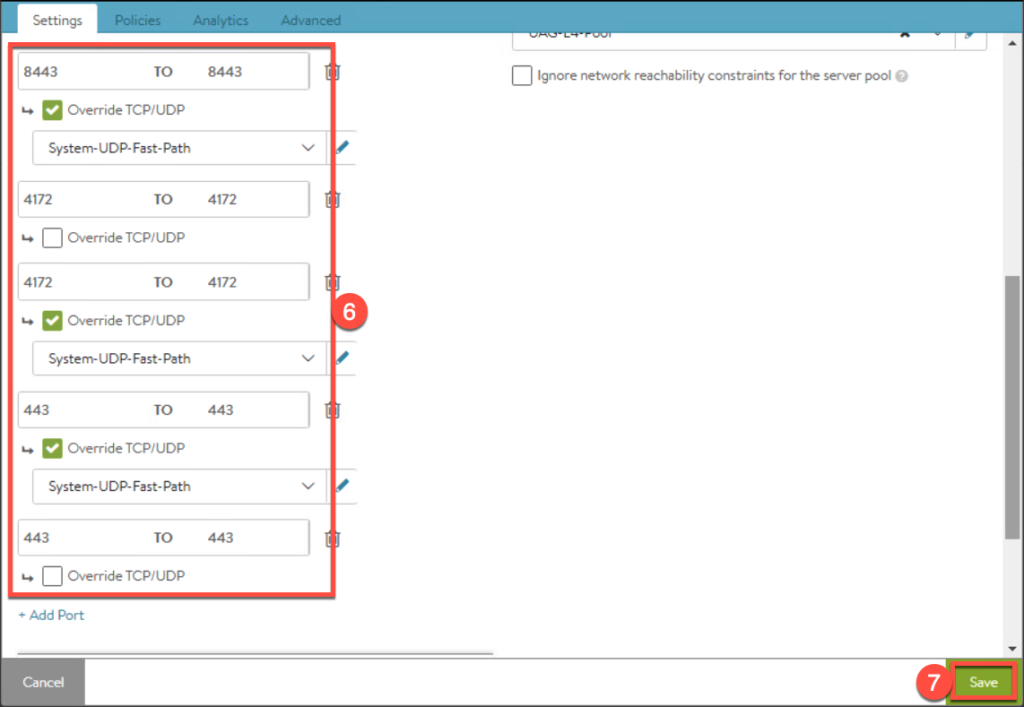
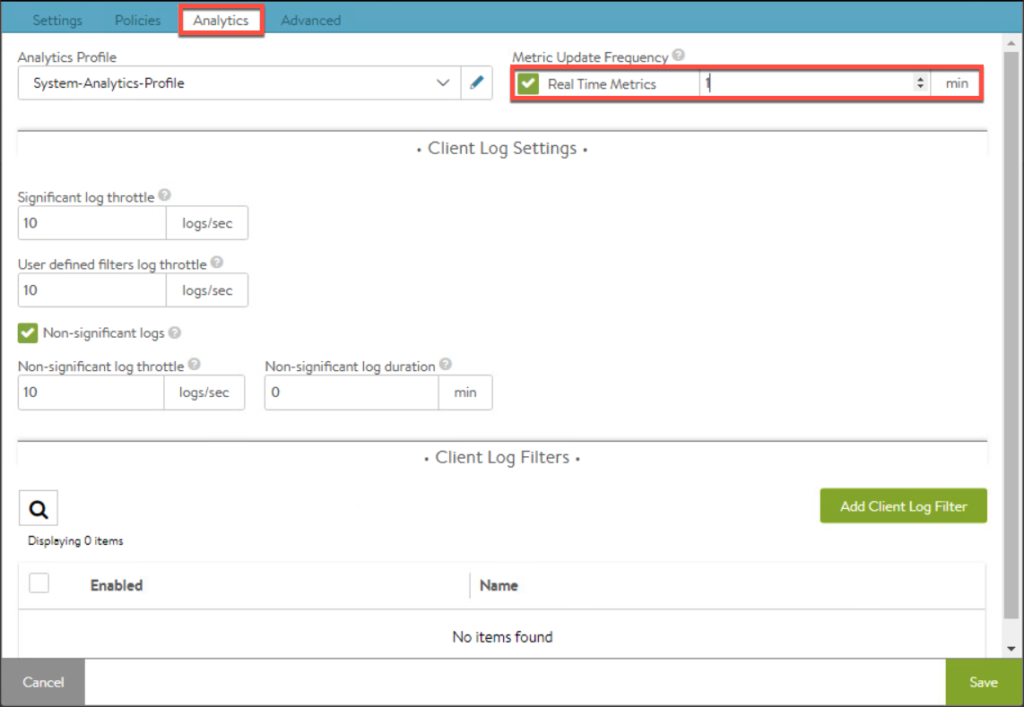
17. Enter the parameters for Virtual Service and [Save].
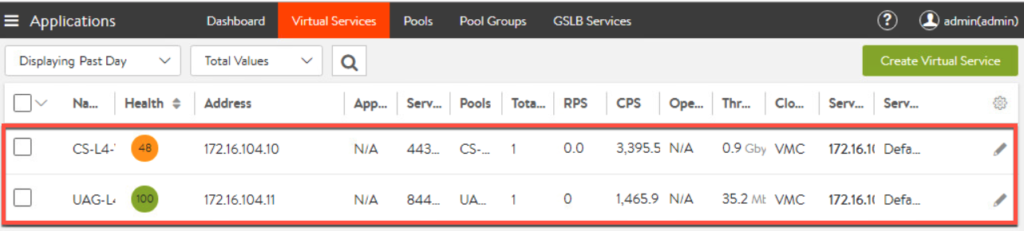
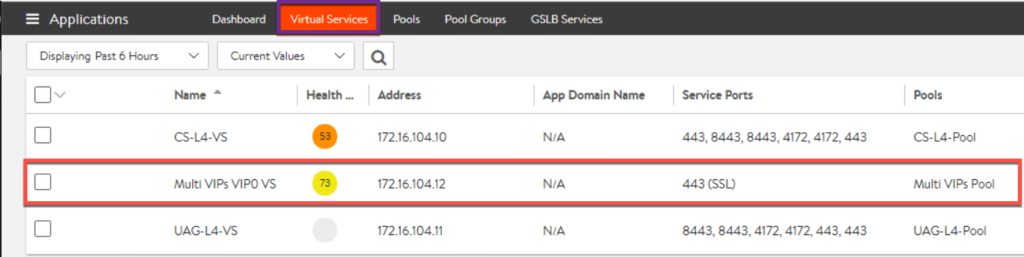
18. Confirm Virtual Services are created successfully and exist in list as seen below.
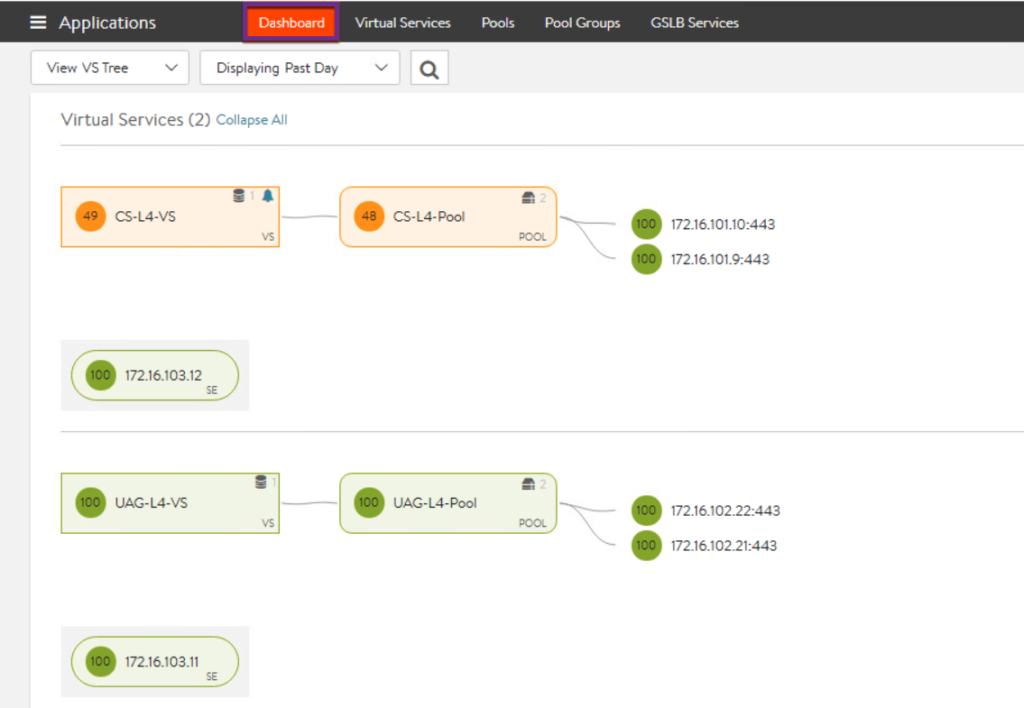
19. Go to dashboard and click in [Expand] hyperlink to confirm the health of components. If there is any component in error state, there might be some issue with configuration.
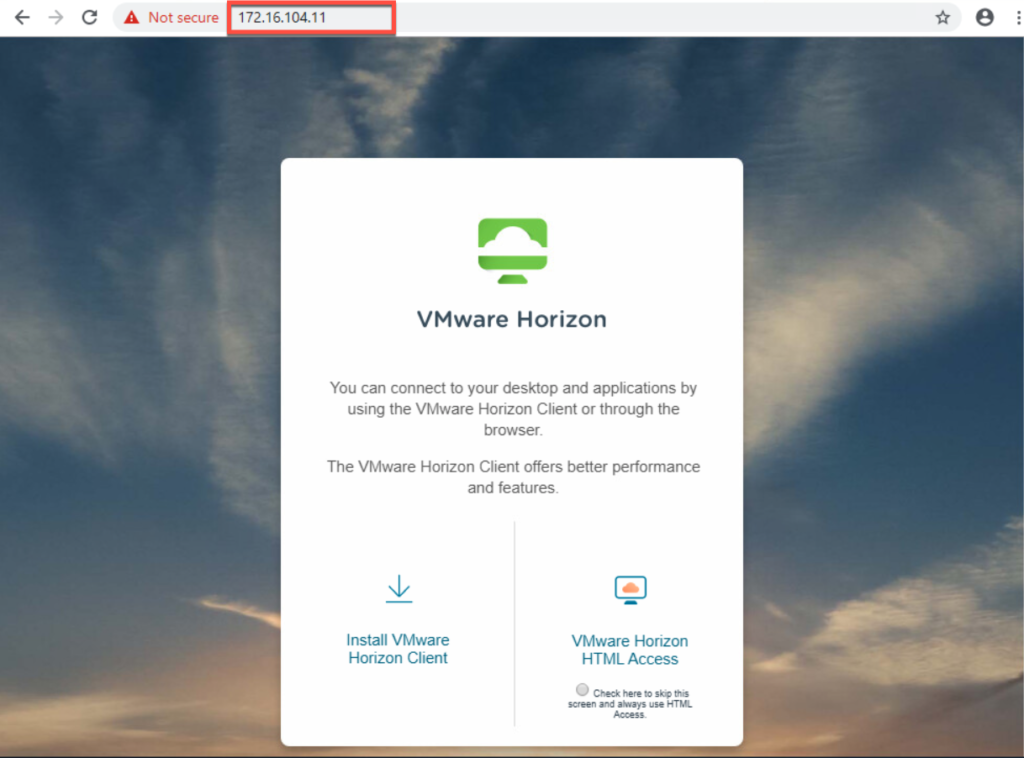
20. In this stage, if your configuration is correct, you should be able to access horizon environment with loadbalancer VIP address as seen below.
- Accessing horizon via loadbalancer (VS) IP in front of CS

- Accessing horizon via loadbalancer (VS) IP in front of UAG
Configure NAT Rule IN VMware CLoud
21. Log in to VMware Cloud (VMC) on AWS console >[Networking & Security]>[NAT] > [Add RULES].
Here you will configure the NAT for public IP used for external access vs loadbalancer IP which sits in front of UAG. For test purpose, I am allowing all the traffics towards UAG but for production environment you can allow only the ports which are required for Horizon.

Configure Unified Access Gateway
22. Log in to Unified Access Gateway admin console and configure as below.
- Connection Server URL = Loadbalancer IP sits in front CS
- PCoIP External URL = Public IP used for external access
- Blast External URL = Public DNS record registered with public IP
- Tunnel Proxy URL=Public DNS record registered with public IP
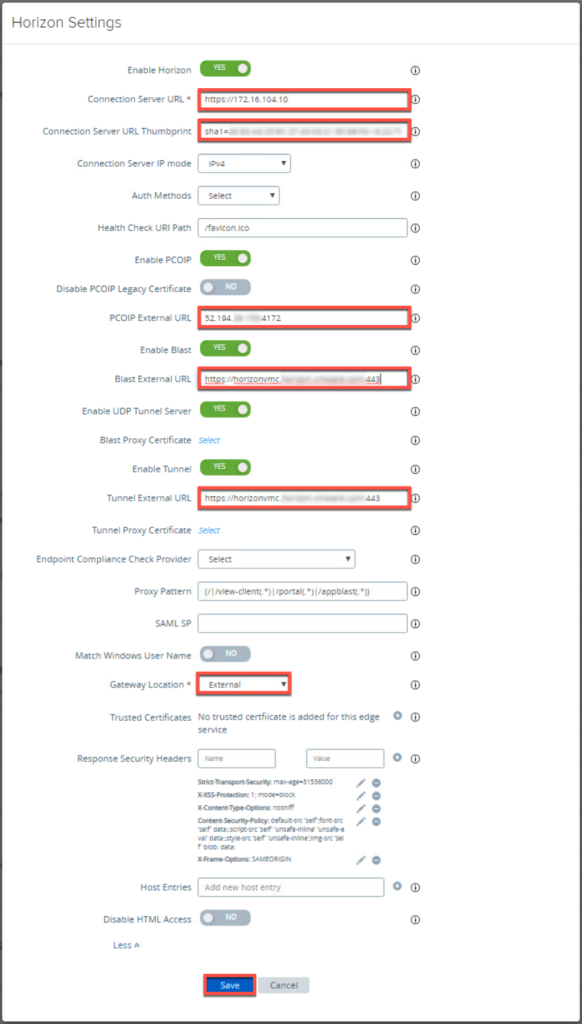
This must be configured on all the UAGs exist in horizon environment.
Validations
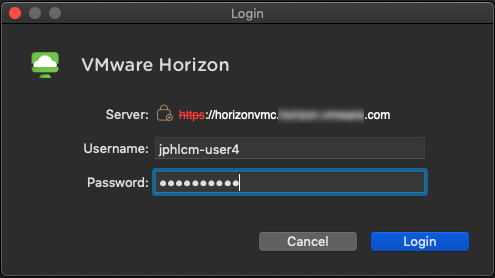
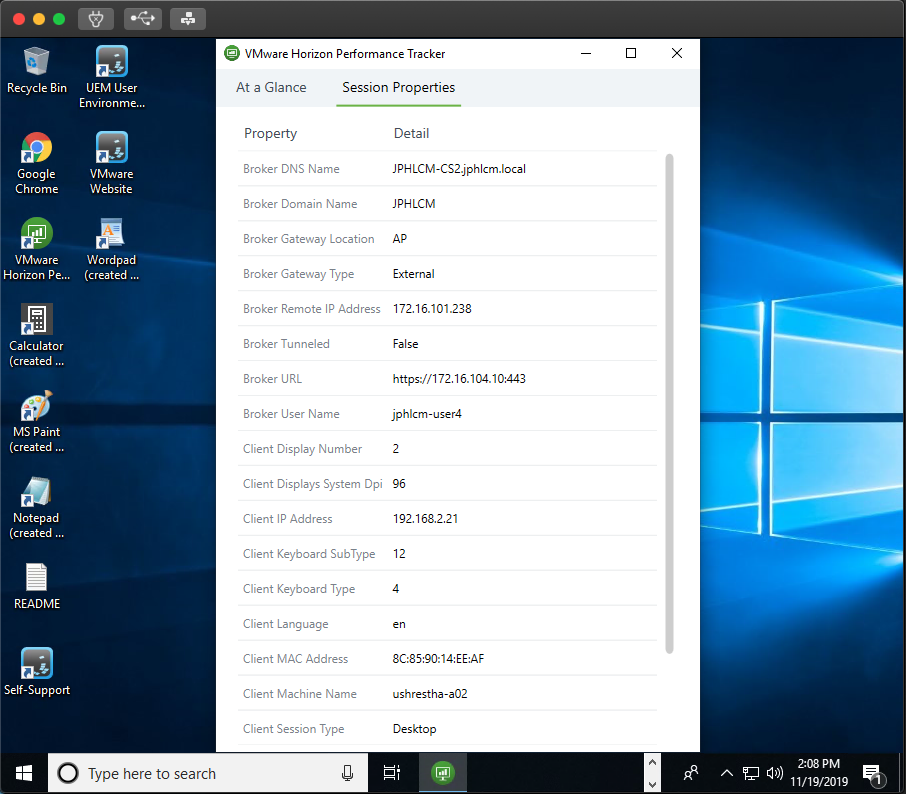
23. Access external URL via Horizon Client app or web browser and confirm you are able to lunch horizon desktops or apps.
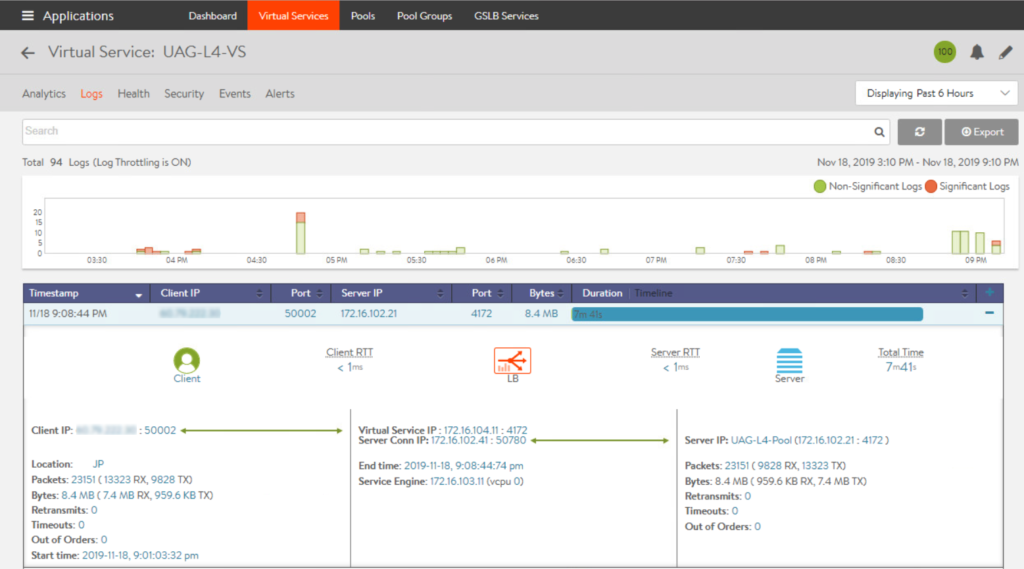
24. You can confirm the user access detail from AVI Networks admin console. Go to [Virtual Services] > select respective [Virtual Service] for which you want to check the detail > [Logs].
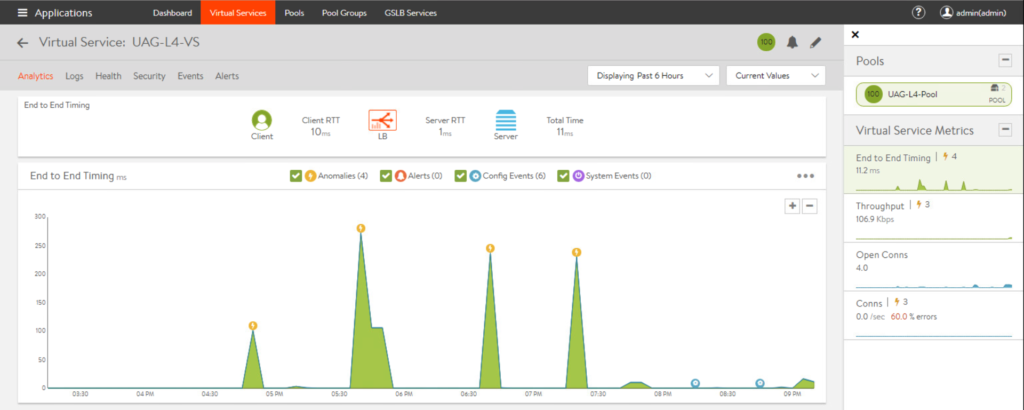
25. To view virtual service analytics, go to [Virtual Services] > select respective [Virtual Service] for which you want to check the detail > [Analytics].
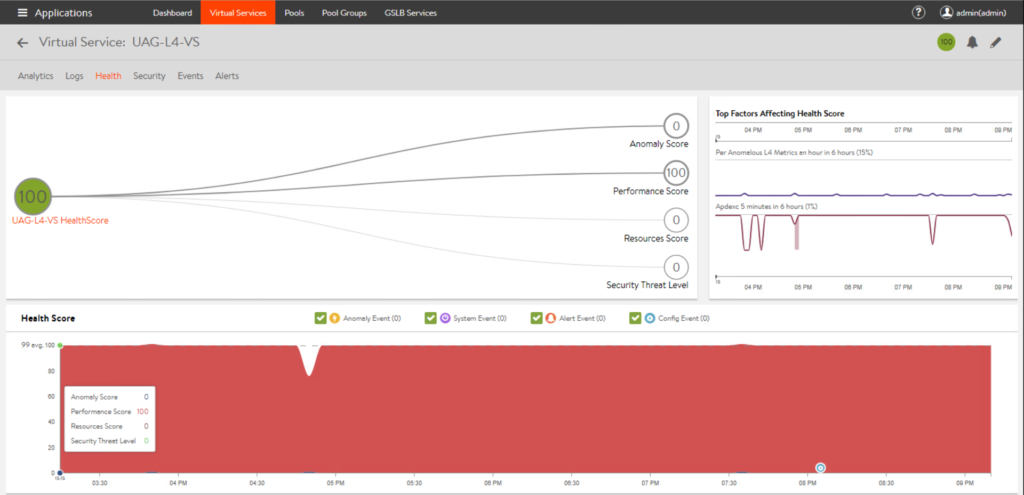
26. To view virtual service health, go to [Virtual Services] > select respective [Virtual Service] for which you want to check the detail > [Healths].
B. Deployment Layout for “(n+1) VIP”
Create Pool
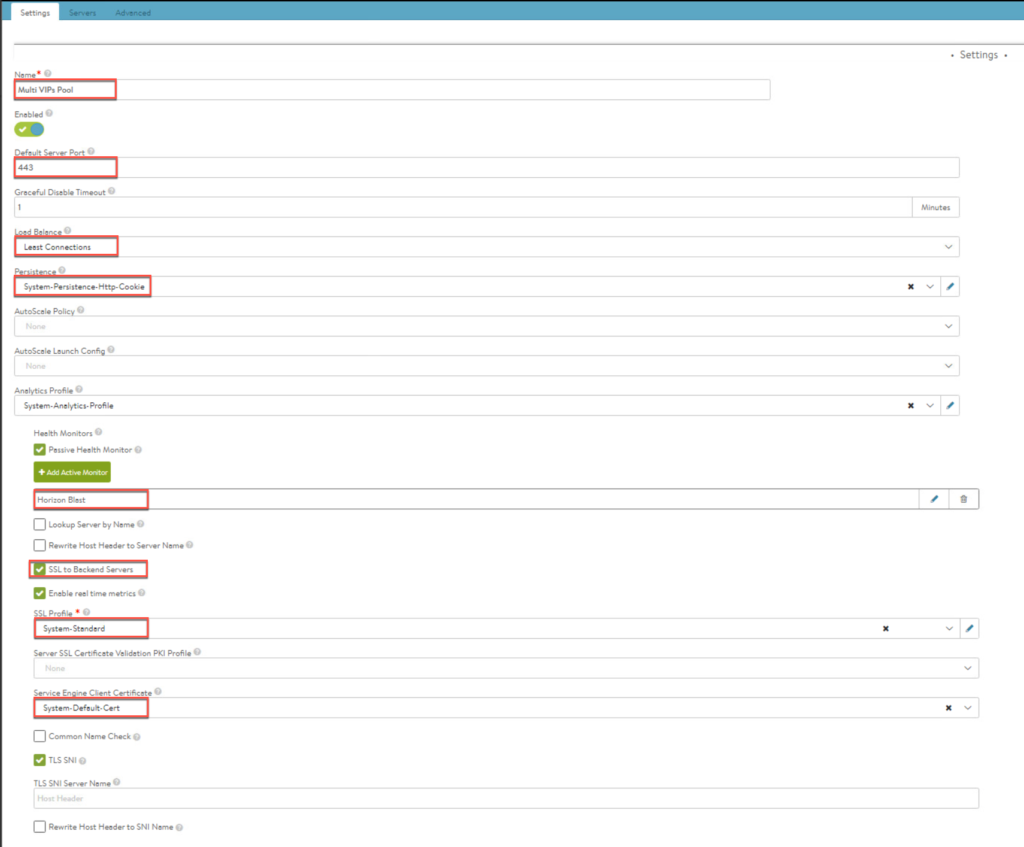
27. Create a pool for (n+1) VIP.
- Load Balance= Least Connections
- Persistence=System-Persistence-Http-Cookie
Create Virtual Service
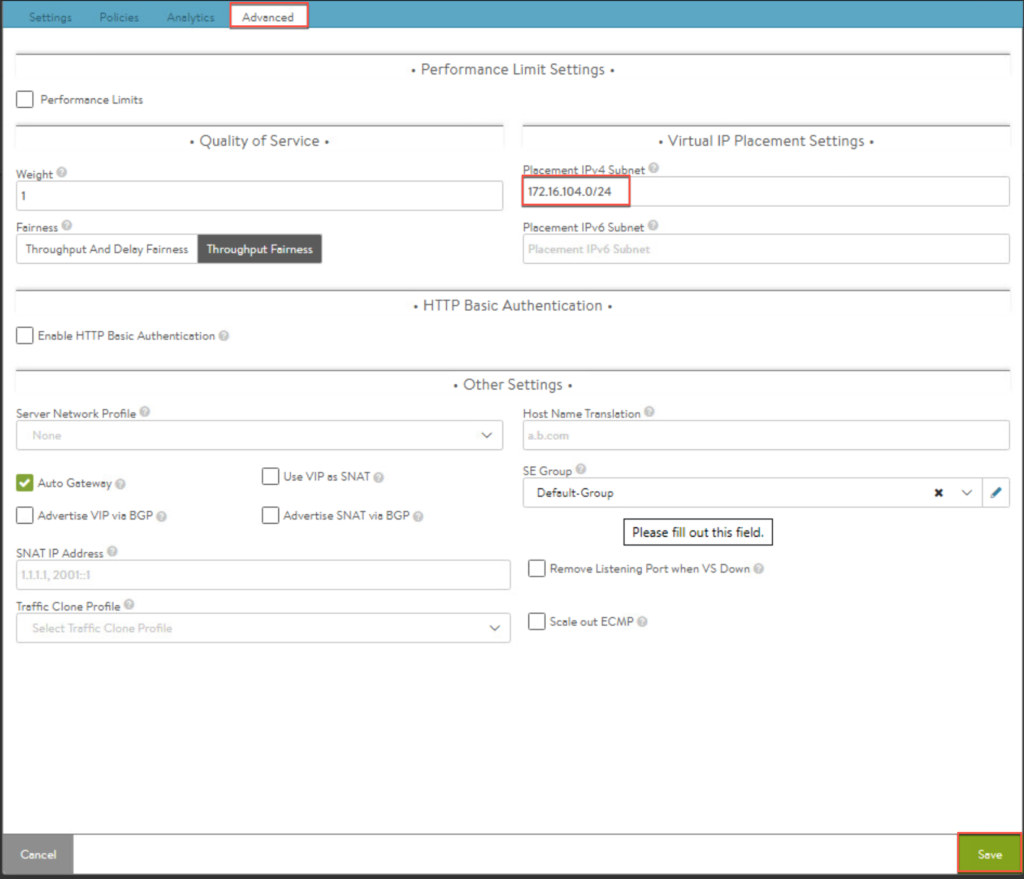
28. Create a L7 virtual service.
- Application Profile = System-Secure-HTTP
- TCP/UDP Profile = System-TCP- Proxy
- Service Port = 443

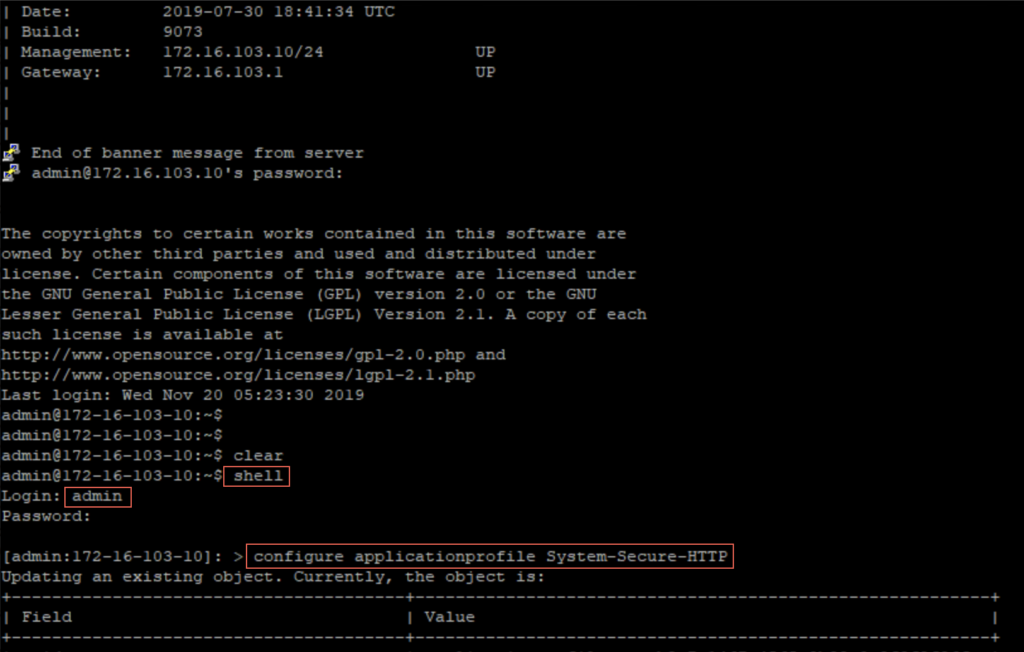
29. Disable “response_with_100_continue” on AVI controller.
SSH to Avi Controller > go to shell and follow the steps below:


Configure NAT Rules In VMware Cloud
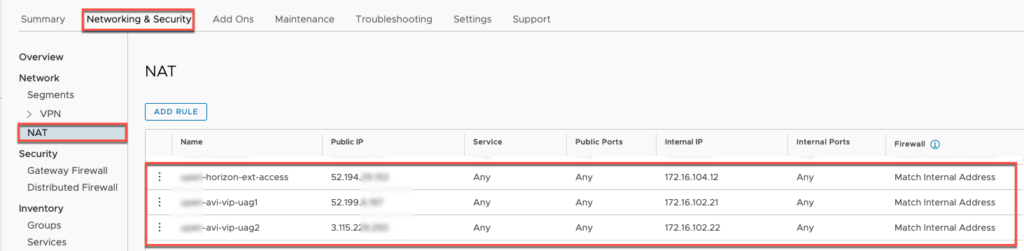
29. Here we need to configure three NAT rules since VS and each of UAG holds public IP in (n+1) VIP deployment.
Configure Unified Access Gateway
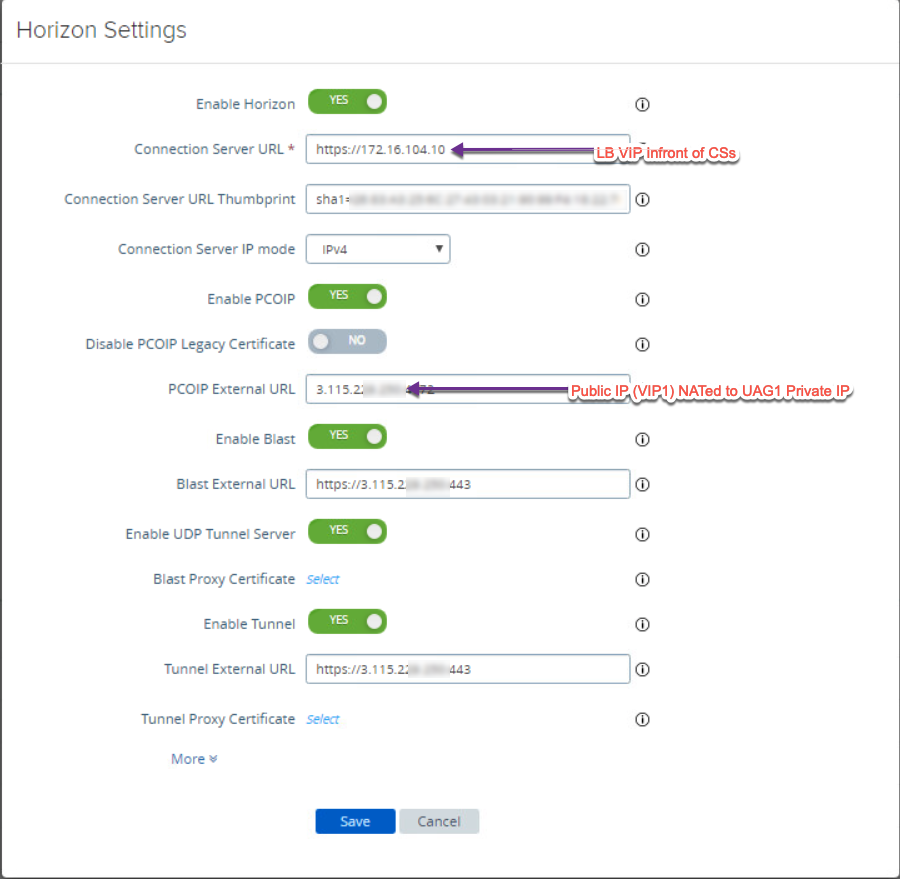
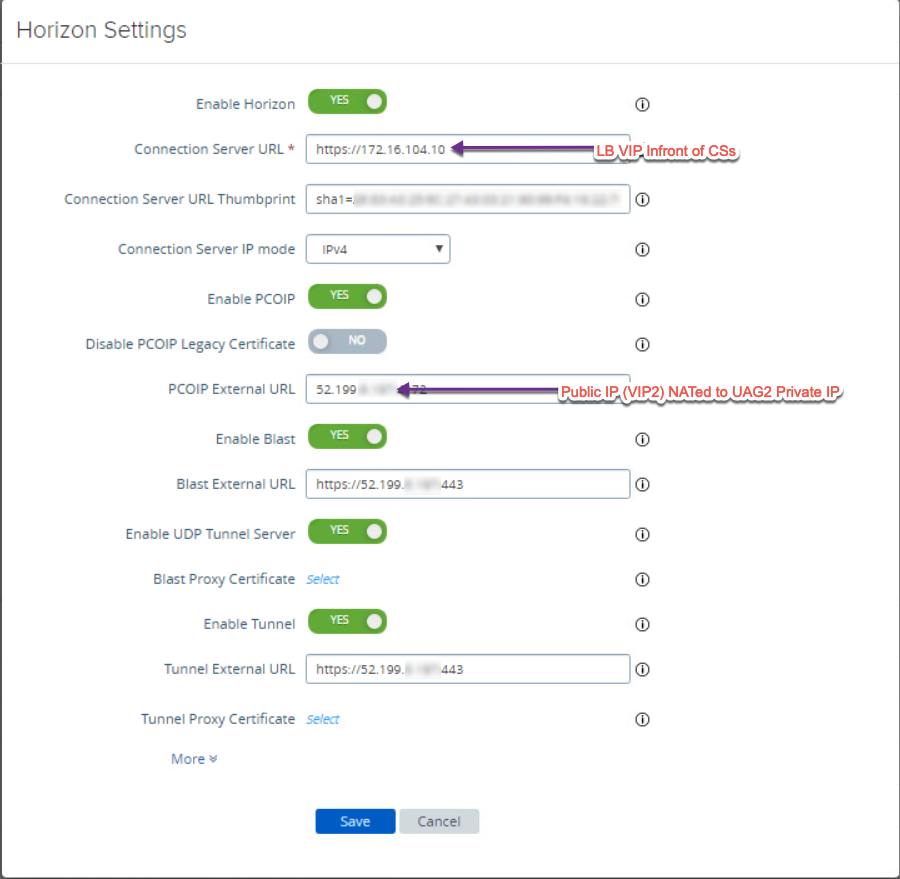
30. Each UAG need to be configured separately. Point the connection server URL to VS sits in front of connection servers (same for all UAG). For the external access (PCoIP & Blast), enter public IP which are NATed to UAG private IP in step-29. External access IP/URL will be unique to each UAG.
- UAG-1
- UAG2
Validation
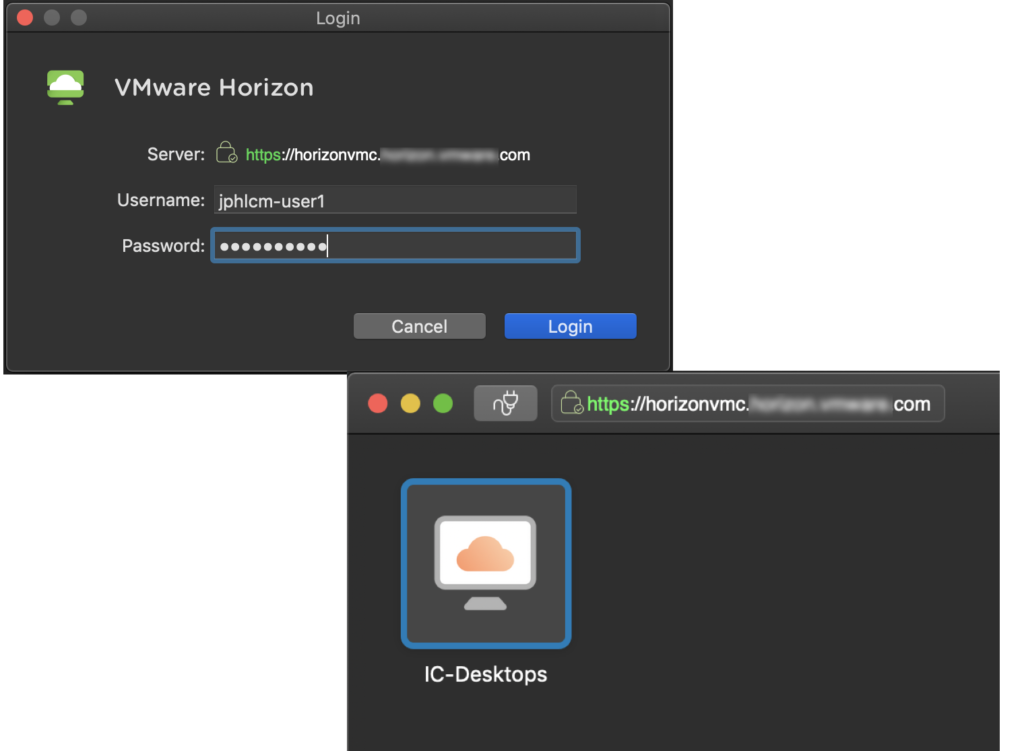
31. Access to horizon external URL via Horizon Client app or web browser and confirm you are able to lunch horizon desktops or apps.
![]()